I just completed my first overnight at Anza in quite a while. My plan was to stay from Friday afternoon until Sunday morning. I had two objectives: finish the excavation with John of the second footing for the pier that will support the rails that extend beyond the north end of the observatory and, at night, shake down my new imaging equipment configuration.
I got there about 1 PM with another beautiful day there - temps in the low 90s, very low humidity (less than 10%), light breeze, and a very dark blue sky without a single cloud. John showed up about an hour later and we got the excavation down to about half a foot in two hours. The slow progress was due once again to using a jack hammer to break up the solid rock a few inches below the surface soil. By 4 PM we stopped to wash up and get our equipment set up for a night of imaging or, in my case, equipment shake down.
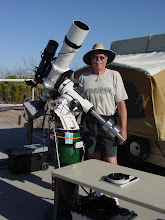
This was the first time I set up in the new observatory; John set up on his observing pad about 30 yards away. An observing pad is simply a 12 foot by 12 foot concrete slab supplied with electricity, and sometimes a permanent mount aligned with the North Pole. John will be selling the lease to his pad when the observatory is completed, as will I.
I set up all my equipment before it got dark. The night became very dark with the Milky Way being visible from Sagittarius in the south all the way through Cassiopeia in the northeast. One way of quantitatively measuring how dark the sky is is by using a portable photometer called a Sky Quality Meter. It measures how bright the dark part of the sky is directly overhead. The higher the number, the darker the sky plus the scale is logarithmic rather than linear. If you live in a city and can see only a few stars, your reading would be no higher than about 17. If you can just barely make out the Milky Way when its overhead, your number is probably about 19. That's what it is at my house. The darkest measured anywhere on earth is about 23. That's 4 numbers different than at my house but is actually about 40 times darker. A difference of as little as 0.3 can be very easily apparent to the naked eye. Friday night at Anza, that number was 21. Visually, I already mentioned how bright the Milky Way was. There were easily several thousand stars visible and some of the brighter and larger objects were naked eye visible.
With my equipment I had to get several different systems working. With the equatorial mount, a Losmandy G-11, I needed to learn the procedure to align it with the North Pole. This is necessary so that I can take long exposure photos of the sky and not have the stars streak on the image as the earth turns. I needed to get it accurate to within less than 10 minutes of arc - that's less than 1/3 the diameter of the full moon. Surprisingly that was done pretty quickly. The next part was to get the auto guider system to work. That is made up of a small refractor telescope piggybacked on my main telescope, with a small camera that is linked to a program on my laptop computer as well as the G-11 mount. What this system actually does is to take a picture of a specific star every 2 seconds, the software then determines how much it has moved over the two seconds, and then signals the telescope mount to correct its movement to accommodate the change. This is necessary because all telescope mounts have some inherent variability that needs to be reduced as far as possible to have pinpoint stars when you image. In this case I got the software to talk to the camera but it could not recognize the mount. That's something to work on for next time. My main system I use for imaging is a refractor with a 4 inch diameter lens and an old Canon Rebel DSLR camera that has been modified. Another software program will tell the DSLR to take a picture, how long to expose it for, whether to store the image on the camera chip or download to the laptop, and how long to wait between taking pictures, and how many pictures to take. Typically, for one object I will take 60 pictures of 3 minutes each, separated by 12 seconds (the time necessary to transfer the image to the camera chip. In this case the software would not operate the camera as had been advertised so I need to find the correct drivers on the Internet. As a result, I was pretty much done by about 10:30 PM that night with no hope of imaging on Saturday night.
Fortunately a couple of other members came by about that time with a bottle of wine and several cups. I could tell that they must have left an empty bottle somewhere on their journey over to me. They hung around until the bottle was empty and moved on. I actually went to sleep in the warm room shortly thereafter. John has his telescope imaging set up perfected. He sets up by sunset, programs it for the entire night, and then either goes around socializing, visually observing, or going to sleep.
I have found that one rarely sleeps much past sunrise in the desert. John came over and we drove ten miles into Anza for breakfast. Good food, not expensive, and lots of the locals from 80 year old cowboys to the native Cahuilla Indians.
We got back and started on that second hole again, finally finishing it by 1 PM. At that point we decided to map our electrical circuits in the observatory. We have 4 fifteen amp circuit breakers and figured out what circuit currently powers what outlet or light. By about 2 PM I decided to call it a day and head home since I was unable to image Saturday night.
Regarding the observatory, we have several options for the next steps:
1 - John will fabricate a rebar assembly for the two pier footings. Then we will get a 2 bag cement mixer and the necessary cement mix.
2 - I'll get 10 gallons of outdoor paint and mix it with the special additive I found. Its a NASA-developed infrared blocker to be mixed with paint. It blocks 99% of the infrared radiation longer than 1 nanometer. That will deflect most of the heat energy from sunlight and keep the observatory walls cooler during the day so it will not adversely affect our imaging at night. We decided it will be easier to use a roller with this material rather than the power sprayer we were considering.
3 - We will re-design the electrical system as far as possible to meet our needs which are a bit different than the original owners. Once we complete the design, I'll do the re-wiring.
If we go with the pier footings first, we will probably follow that up with the roof fabrication and hold off on 2 and 3 above.
Since I'll be having knee surgery this Wednesday, it will probably be a couple of weeks before I am out there working again.
Saturday, October 17, 2009
Monday, October 5, 2009
October 2
After several memorable family events over the last month I made it back to the observatory this past weekend. Although I have been AWOL my friend John was busily working several weekends. He worked on continuing the demolition of the old dome supports, cleared brush for a further twenty feet north of the building, and completed fabricating and installing most of the stairs leading up to the observing area and completed the outside grouting project.
 Stairs are completed except for the bottom floor platform.
 Dropped eave on the left next to our debris pile.
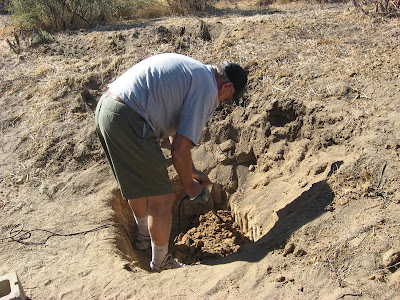
 John using the jack hammer as he digs below grade
 Tom using a small jack hammer in hole
 The holes don't look like anything much but that was almost 8 hours work by two people with a power tool. Our next step is to complete the second hole next weekend. After that we will either proceed with pouring the footings and erecting the support posts or spray painting the observatory exterior.
Stairs are completed except for the bottom floor platform.The day was gorgeous - I think I know why people live there despite the amazing heat of June thru August - the rest of the year is terrific. Saturday was terrific - bright blue sky, 75 degrees, low humidity, and a light cool breeze.
Saturday also marked a milestone - the final demolition was 99% completed with the removal of the last roof eave from the warm room roof. The remaining 1% are the two top plates on the east and west walls which will stay in place until we are actually ready to install the steel rail structure.
Dropped eave on the left next to our debris pile.Most of the eight hours we worked involved excavation. We have two post holes to dig to support the two posts that will support the rail system that will extend to the north of the building for five feet. As can be seen from the photo below where John has just started to dig below grade after excavating the loose soil, there is a steep five foot slope immediately behind the north wall that we had to excavate through just to get to the observatory floor level. Based on the loose soil that made up the slope we removed, the plan was to dig footings three feet across and up to two feet deep.
John using the jack hammer as he digs below gradeHowever, once we dug down to grade, the loose soil ended and we reached what is commonly called "desert pavement" - fine grains of rock that have gradually glued together with "desert varnish" over a long period of time. Not even a pick helped to break up this stuff. Fortunately, we had a small jack hammer that we used extensively. John used the jack hammer to break up a few inches of the rock, then I cleared out the loosened rock. Back and forth for hours. By the end of the day we ended up excavating about 15 inches with one hole. Since we were going into solid rock, we decided 15 inches was deep enough for the footing.
Tom using a small jack hammer in holeWe called it a day at that point. Below you can see the near hole only;y had the slope cleared down to grade while the further hole is full excavated. Notice below that we threw much of the cleared rock on top of the slope to serve as a berm to direct any water flow away from the observatory.
The holes don't look like anything much but that was almost 8 hours work by two people with a power tool. Our next step is to complete the second hole next weekend. After that we will either proceed with pouring the footings and erecting the support posts or spray painting the observatory exterior.
Subscribe to:
Posts (Atom)