We're beginning our final push toward completing the observatory. John left for the observatory on May 14 for eight days; I went to the observatory on Tuesday, May 18. When I arrived the weather was miserable: low clouds, damp, and drizzle. Fortunately the rest of the week proved to be 70ish, dry, and light breezes. The optimal plan was to get as much work completed as possible so that by week's end the only major work remaining would be the rail system and the roll-off roof.
I had some back tracking to do. If you remember from the posts from last fall I power washed the outside of the observatory in anticipation of painting it with primer but the colder winter weather came early. (Notice I qualified the weather description with "colder" so as not to insult you Northeasters who tolerate REALLY cold weather. I'm only talking about temps down into the 30s at the lowest - only too cold for outdoor painting.) As a result, the winter rains caused the untreated cinder blocks to weep again as shown below.
 Since our rainy season is done and virtually no rain will fall before August when the Arizona monsoon occasionally backs up into our area with thunder storms, I decided it was time to start on the outside, even though the roll off roof is not yet built. Here is a view of the south side of the observatory from a bit down the hill prior to power washing on Wednesday.
This particular spot from where this picture was taken has some recent notoriety. Last Saturday a four foot diamond back rattler was found and disposed of at this spot. This seems to be a harbinger of some change of wild life recently in our area. For the nine years I've been coming to this site through last summer, no rattle snakes had been found. Last summer, a member's Labrador retriever was bitten by a rattler; fortunately he survived thanks to some very quick emergency treatment. Now there was the one last Saturday. Then on Wednesday evening we saw a three foot rattler on a dirt road about 200 yards from our property gate. Three rattlesnake sightings in one year and none for the previous nine years seems to be saying something. Another change is a sort of symbiotic relationship between coyotes and desert hares. Desert hares are Eastern rabbits on steroids. They are typically the size of a very large cat and are the primary food source of coyotes. Suddenly this spring we are overrun with hares. They are virtually unafraid of people, roaming to within five feet of people while rooting. Why so many hares? There are hardly any coyotes. Typically at night you can hear literally dozens of coyotes howling once one starts up. This spring we've only been hearing a few at a time. Our guess is that the cause is the increase in permanent human habitation in the valley from two houses within eyesight several years ago to about six now. We're getting too settled for the coyotes in our opinion. The fourth change is the appearance of a rodent called the kangaroo rat. Although native to California and our desert habitat, we have never seen any at all in our valley. There are now at least half a dozen families living on our property. A different type of lizard has also appeared. The normal population are small speckled ones about 4 to 5 inches long. The ones who just moved in are dark and almost a foot long but much more shy the the smaller ones. That's more than enough desert biology for now.
On Wednesday I power washed the outside as planned. Here's a shot of me having fun. This was the easy part. The hard part is the same as last fall: I had to lay out four hundred and fifty feet of water hose up the hill to the nearest tap at the club observatory. To give a visual of that distance take a look at the picture below which is serving a dual purpose.
 This was taken from the top of the hill by the water tap. Our observatory is on the left of the picture. The second purpose of this picture is in the distance. On the horizon beyond the ridge line is a darkish sky layer. That view is looking west toward the LA Basin but that is not smog. It is our infamous "marine layer". It is a deep, dense fog bank that hovers permanently over the California Current. The Current is a Gulf Stream-like ocean flow but coming down from Alaska and keeps the coastal water cold all year long - usually in the 60s. It helps to moderate the air temperature along the coast. The marine layer can be blown hundreds of miles off shore or up to a hundred miles inland. Its advantageous to us amateur astronomers when it rolls in at sunset. Under the best conditions, the marine layer covers the coastal cities and inland valleys up to 3,000 to 4,000 feet altitude, blocking all the artificial light and keeping the night sky where our observatory is located at 4,500 feet as dark as possible.
After power washing the outside walls on Wednesday, I waited until Thursday afternoon to begin painting to give the blocks enough time to full dry out. Meanwhile there was plenty of time to do other work. On Tuesday I finished spackling the inside wall that separates Phillis's room from my control room. I had hoped to get the wall painted but ran out of time this go round. Phillis' room and my control room
However, I also completed installing the ceiling panels in Phillis' room as well as most of my control room. I would have finished my control room ceiling except we made some last minute electric changes and had to run some additional conduit in the ceiling which we were able to complete. In the picture above, you can see through the pocket doorway into Phillis' room which is 7 feet by 11 feet, not very large but fine to hang out in at night with white light. Also, except for when Phillis is sleeping there, the door will be open to my control room which is 11 feet by 11 feet. At the very top of the picture you can see part of one of the ceiling lights. There are two in Phillis' room, two in my control room, and two in John's control room (which I'll get to shortly). We were very fortunate with light fixtures because they normally cost $400 each but John's work re-designed their offices and tossed out the light fixtures which we promptly appropriated.
By Friday noon I had finished painting the building. I left the north wall unpainted because currently we have materials stacked there plus we may add an attached shed there in the fall. Here are some pics of the completed paint job.
View above from the east or head of our driveway
 View uphill of the south side of the observatory
We'll evaluate the quality of the coat in a week to determine if an additional primer coat is necessary but I'm betting that, at most, some touching up should be all that is necessary. The regular paint coat will follow and will include a NASA developed additive that I found. Its purpose is to reflect virtually all of the infrared light hitting the observatory. That should keep the inside cool and limit the cool down time in the evening when we open the roof.
The last thing we worked on was weed clearance. Normally, by the end of May we are required by our lease agreement to clear all brush for a distance of twenty feet from all structures for fire prevention and limitation. All annuals, especially grasses, have completed 90% of their growth by that time and start to dry out by then. They grow fast and can be up to four feet high before they start to dry out. Because of the new threat with the appearance of a number of rattlers, we cleared the grass for up to sixty feet from our observatory at some points. We just cut and drop the grass - within a couple of weeks it dries to powder and blows away.
While all this was going on, John was diligently working on building his warm/control room on the observatory level from the floor up. He built the walls and roof as modules at home and trucked them out to our site last Friday. By the time I showed up on Tuesday he already had the walls and roof assembled. The rest of the week he was running electrical conduit and lines and water proofing and paneling the outside walls.
 In the above picture taken from the club's main observatory, John is on our roof installing flashing when not waving to the camera. You can also see the east wall partly tar papered. The other object is a storage container that is actually more than forty yards behind our observatory.
  The roll off roof will be above John's warm room.
In the picture below of the west wall, you can see part of John's warm room with a slanting upper west wall. That is to accommodate the roll off roof with a clearance of about two inches. On the top of the cinder block wall, you can see two metal plates, the beginning of the rail structure for the roof.

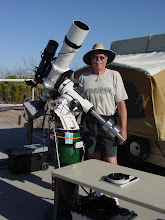
For almost a year now, you have patiently read about the observatory and seen only construction pictures. For the first time, below is a picture showing a sample of what the observatory is for - John's telescope equipment for imaging. Mine will remain at home until the roof is completed. The setup is temporary but is located where his permanent pier will be. With this equipment and his knowledge of astronomy and his imaging techniques, John is already talking astronomical pictures among the best in the world. 
Here is a closeup of his equipment:
 As to the roof. Several weeks ago we decided that the method we have available for building the roof is somewhat dangerous and as a result have contracted the services of our club member who is a contractor and recently built the three observatories I featured in earlier blogs. The agreement is that John and I will complete the rail system on top of the observatory,. Gary, the contractor, will fabricate the roof from the wheels up. "Will" may not be the correct tense since earlier this week he updated us and said that he already has half of the roof trusses completed off site.
On Saturday I drove down to Palomar from home to conduct docent tours of the 200 inch Hale telescope. There were only three fully fledged docents and four trainees so I ended up doing parts of three different tours. I ran into a novel situation. On one tour with about thirty people, one person insisted he had read about the telescope mirror being removed twenty years ago and taken to Cal Tech in Pasadena for re-figuring. In reality, the mirror has never left the mountain since it was delivered in 1948. The dilemma was what to say at this point since the gentleman insisted he was right but I didn't want the rest of the visitors to have incorrect information. What I did was hand him my email address and asked him to send me information - newspaper, Internet link, whatever - that I could use to confirm his story and relay that information to the Cal Tech and Palomar historians who must have been misinformed. That seemed to do the trick. Being docent is a fun thing to do, gets me up into the mountains, and frequently gets me access to the observatory at night, and actually got me an interview on BBC TV in 2005.
I hope you enjoyed this update as much as I enjoyed writing it. With luck, we will have first light by mid-summer.


 This is John's temporary pier in the southwest corner of the observing area. He has notched the concrete so that the pier feet can sit in the same place for several months. This will be the location of his permanent pier.
 Inside the main warm room, we have removed the old fluorescent tube light panels and have replaced them with four of these newer and more efficient panels. John got them for free when renovators at his workplace miscalculated the lighting fixtures and ordered too many. They were going to throw them out when John appropriated them.
 Now for today's work. I needed to secure the two interior wall sections to the cinder blocks walls with masonry screws. Then I had to make a brace to span the space for the pocket door kit. Remember that the top sill for each wall section simply butted together. I had to use the brace to splice them together. Then I assembled the pocket door kit - according to the directions which specifically said NOT to remove the small wood spacers that kept the integrity of the door frame during shipment. The problem for me was that I saw two of them - there was a third that I mistook for a strengthening piece. Suffice it to say that later when the kit was assembled, inserted into the space for it in the wall, plumbed and squared, and secured permanently with nails and screws - I realized there was a third spacer that was never mentioned or shown on the directions. This had been causing me problems in truing up the frame that I resolved with several extra houris of unnecessary difficulty. I realized it was a spacer when I removed the two obvious ones and hung the door. When I pushed the door into the frame, the door edge missed being flush with the frame side by about an inch. It should have slid all the way in and hit a rubber bumper on the far inside if the frame. The third spacer was blocking it. Since there were three screws holding the spacer and their heads were now covered by the 2 X 4s of the wall, I had to chisel out the spacer and then cut the protruding screws with a Sawzall. At that point I decided to call it a day. One unexpectedly favorable surprise saved us some work. We had anticipated that we would have to brace the middle of the wall against the rafters to keep it from moving but there is so much strength in the assembly that we can skip that step. Here is a picture of the finally completed wall in the main warm room:
 This was taken looking west from near where the paved road gives way to the dirt road five miles from the observatory. The snow capped peak is Mt. San Jacinto. Just beyond and 7,000 feet below its peak lies Palm Springs at sea level. People normally see this mountain in the background of the Palm Springs postcards.


 Its been keeping the rain out of the warm room.
 Below is the west footing for the north rail support column, still in its form and not yet back filled:
 Against the back wall are 4 X 4s of dry wall. I had to cut them down from 4 X 8s in the Lowe's parking lot to get them in my van. I provided some fine amusement for Lowe's customers that day. The new stud wall in the middle was built today. I made it into two separate sections as can be seen by the fact that the top sill are in two pieces. That was for two reasons: 1 - I was here alone today and would not have been able to lift and position a wall of that size myself; 2 - The top sill would have been 12 feet long - too long for my van. I did manage to position the two sections and bolt them to the cement slab floor. The empty center part of the wall is the roughed out area for the pocket door and its frame, both of which are leaning against the right hand wall beyond the new stud wall.
 Just a quick explanation. The steel truss work pointing to the one o'clock position is actually what you would call the telescope tube. The mirror is almost 16 1/2 feet in diameter. Now look at the solid tube pointing at the 10 o'clock position in the foreground. It is hollow and I was able to climb inside of it last week. Here is my picture just inside the round entry portal:
 I think this is enough for today. Since we are starting a new season at Palomar and I'm involved there with researching the observatory history and working on a telescope program in addition to conducting tours, I can provide a lot of interesting behind the scenes stories. Please let me know if you would like me to write about Palomar in addition to my observatory.